
Hey, I made a neat little guide for you. Buying and setting up a domain name isn’t really that difficult, but sometimes it’s nice to have a walk-through. So here you go!
This explainer is specifically about registering and configuring a domain at NameSilo, which is where I get all my domains. If you haven’t already, read about why NameSilo is my recommended domain registrar.
Note: If you already bought your domain and it was from a different registrar, don’t panic. You might have paid a bit more than you should have, but it will still work. And the instructions below will still be helpful, although in a more general sense.
1. Create an account, and verify email
Okay, let’s get started. This shouldn’t take long. You have bigger fish to fry, right?
First thing is to go to NameSilo.
Then click the “Sign-up” link in the upper right, and a box will open that allows you to create an account. It’s easy and fast, and you’ll definitely need it.
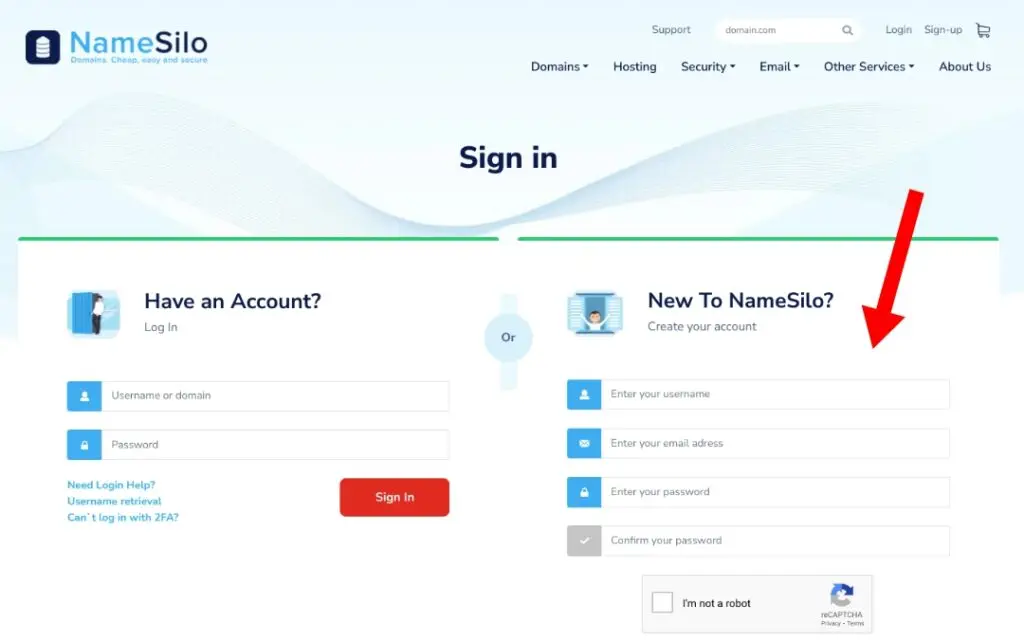
After creating an account, you need to verify your email. So head on over to your inbox, and click the Verify link in the email you just received. When you do, you’ll see a message like this:

2. Add your domain to your cart, then checkout
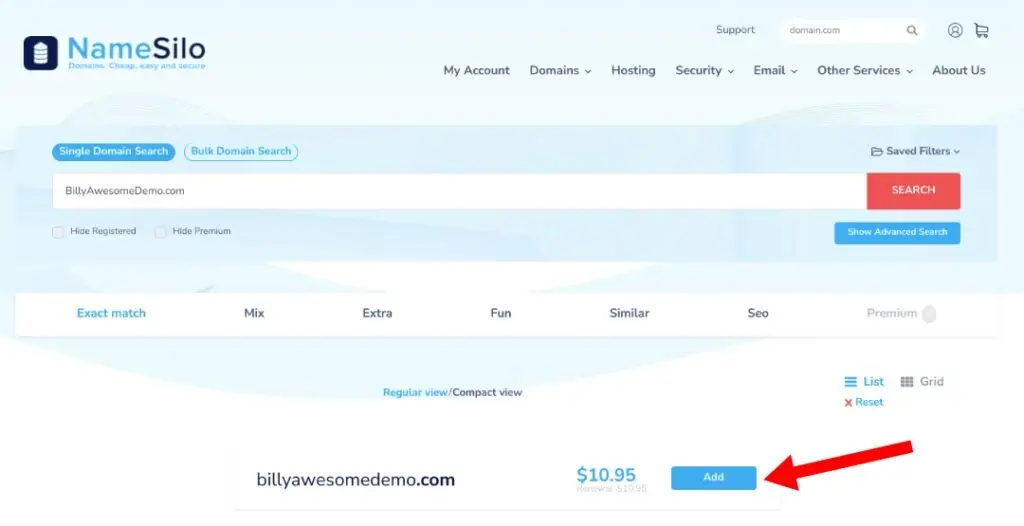
Now click the NameSilo logo in the upper left, to go back to the homepage. It’s time to enter your desired domain name into the search box and hit enter.
(This assumes you’ve already determined which domain name you want, and that it’s available. If you have no idea what domain you want, or you’re struggling to decide what domain you should get, then read this article first. It’s designed to help you get over that hump of indecision.)
Then just click to “Add” the domain to your cart.
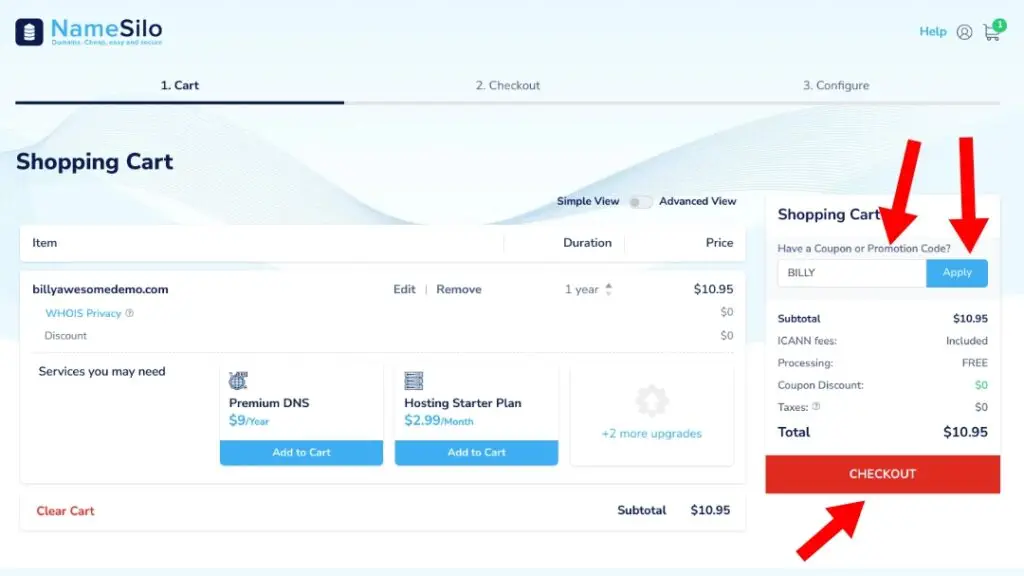
Then click the red “Checkout” button. Now you’re in the shopping cart.
Enter the promo code BILLY in the upper right, then click the “APPLY” button. You saved a dollar, woohoo!
Then click the red “CHECKOUT” button. (You don’t need any of the add-on services. WHOIS Privacy is already included automatically, which is great because it’s absolutely necessary.)
3. Enter payment method, save it to your account, and pay
Now it’s time to enter a payment method. And I’m actually going to suggest that you save the payment method to your account.
Usually I don’t do this anymore when I’m buying stuff online. I don’t like putting my credit card out there and having some 3rd party save it into their systems.
But the reason I recommend it here is because you’ll want to set your domain up to auto-renew each year. It’s really important. And NameSilo can’t auto-renew it unless you have a payment method on file. If it makes you feel safer, use the PayPal payment method (that’s what I do).
Then proceed forward, and pay for the domain name.
4. Point the domain to your web hosting
NOTE: This final step assumes that you’ve already signed up for web hosting. If you haven’t, that’s okay — bookmark this page, go sign up for hosting, and then come back and complete this step. I recommend super-fast cloud hosting from Cloudways.
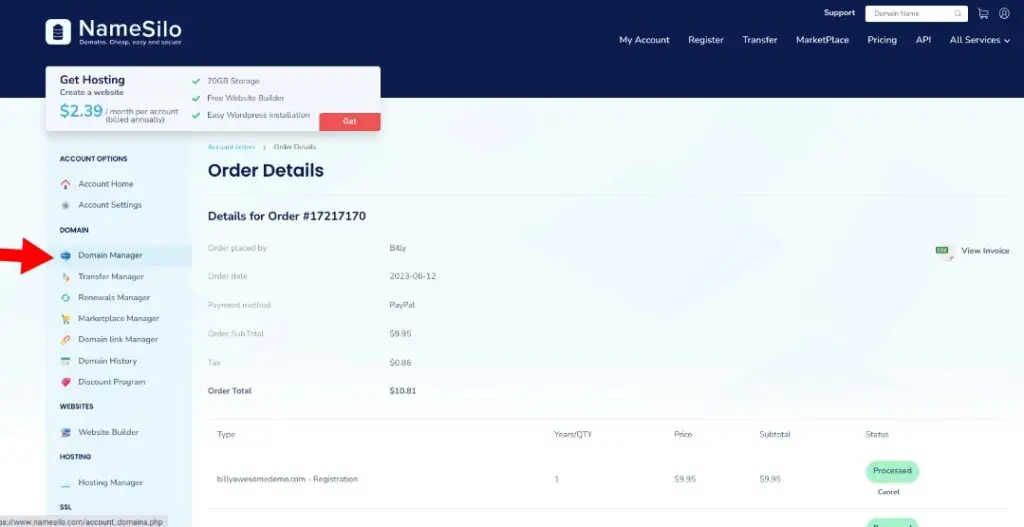
After completing the domain purchase, you’ll find yourself on a page that looks something like the below. This is your My Account area.
Click the “Domain Manager” link in the left menu. It’s time to configure your domain so that it points to your web hosting.
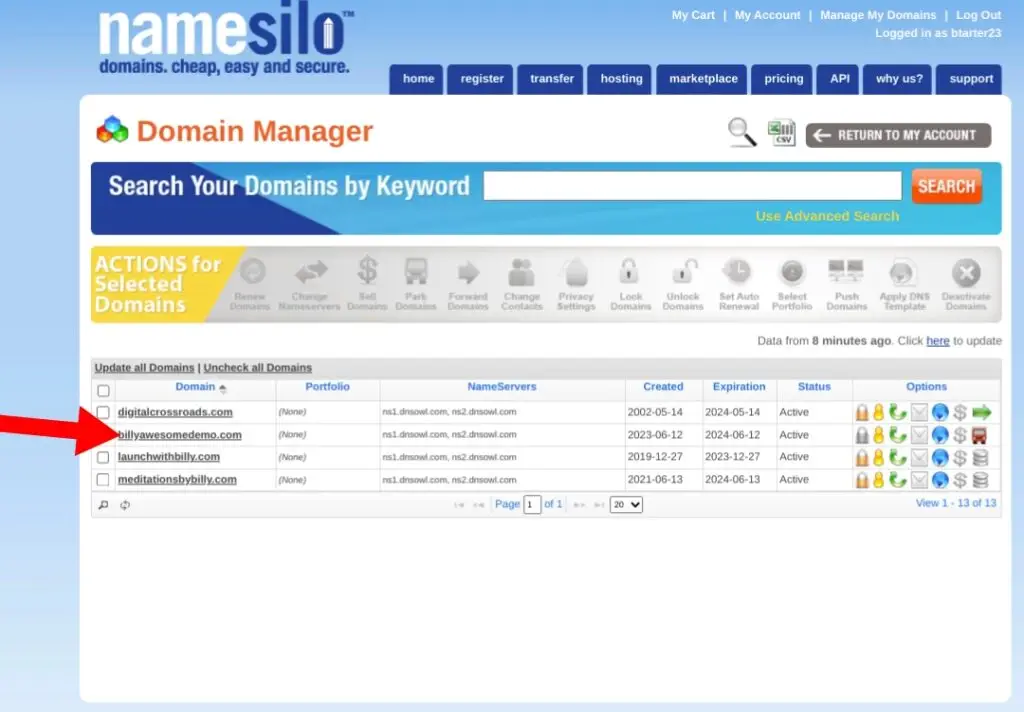
The next screen you see will look a little like the one below (although probably with only one domain in it). This is your Domain Manager area. Yes, I’m aware that the page layouts aren’t consistent, that’s the only knock on NameSilo. Oh well!
Click on the domain you just registered. (Click the name itself.)
Now you’re in the Domain Console, which shows you a bunch of technical details and settings about your new domain name. Don’t worry, you don’t really need to know what most of this stuff does. You’ll probably never need most of it.
We just need to update two things, and then we’re done!
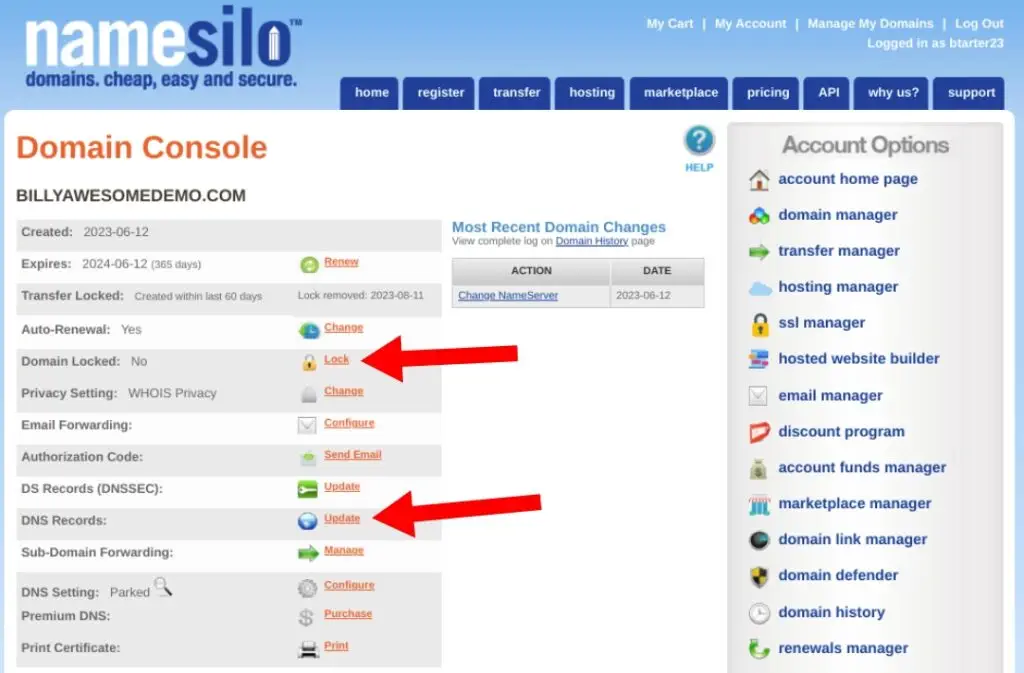
You can see that Auto-Renewal is already turned on. That’s a good thing.
You can also see under the Privacy Setting that WHOIS Privacy is already enabled. That’s great, it means that strangers and spammers can’t find your home address or contact info. If you want, scroll down to see the contacts which are now all hidden behind privacy aliases. So important. And this is free, whereas other registrars will charge you for it.
CHANGE #1: Just above that, the Domain Locked setting is set to “No”. I’d recommend clicking the “Lock” link to lock your domain. Does it do anything? I’m not entirely convinced it does, to be honest, but hey it’s free security so why the hell not?
Next, it’s the main thing we need to change. We need to tell NameSilo where your website is hosted.
Because I’m assuming you’re using Cloudways, my recommended web host, this means we’re going to update the DNS records to point to your cloud hosting server. (If you haven’t signed up for Cloudways yet, then what are you waiting for? Go ahead and do that, then come back to this page and complete this step.)
(NOTE: if you’re using a different web host, that’s fine, I still love you. But you’ll probably want to update your NameServers instead, which is more standard for most web hosts. That means you’re allowing your host to manage your domain. However in the case of Cloudways, we do it a little differently… because you’re a cloud hosting power user now, you really want to have NameSilo continue managing your domain’s behavior.)
CHANGE #2: Click that “Update” link at the end of the DNS Records line, and you’ll see a page that looks like this:
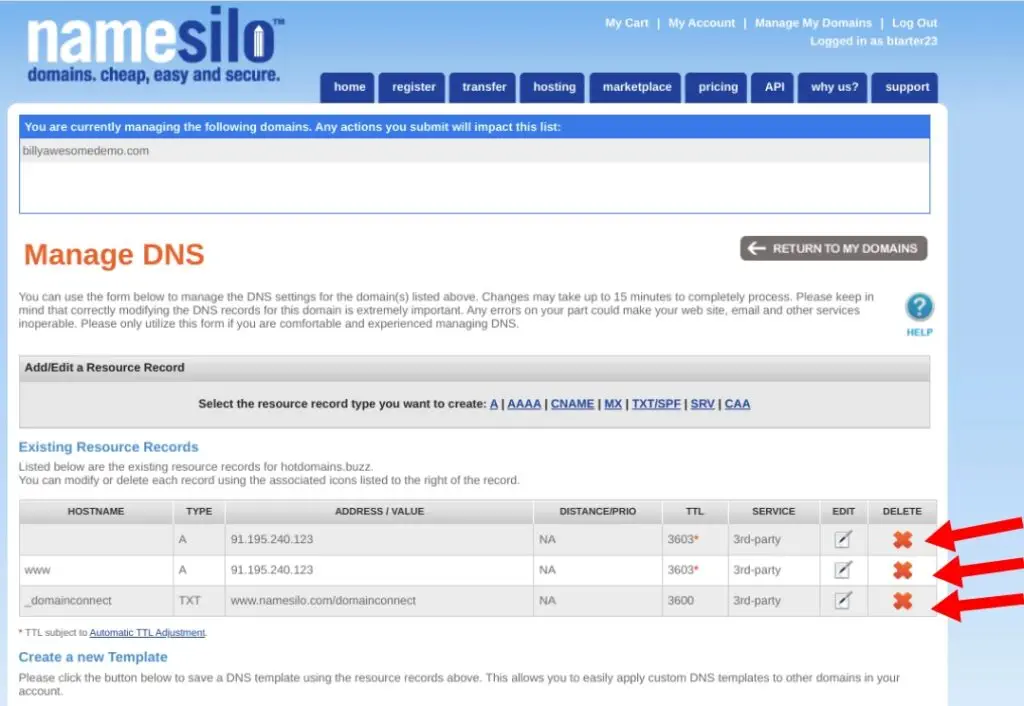
DNS records are like rules that govern the behavior of a domain name. The first thing you want to do is delete all three of the existing rules (aka “records”). Just click that big red X at the end of each record. Don’t be afraid, just do it! You’re not gonna break anything.
Now we gotta get your Cloudways server’s IP address. Open a new tab, log into your Cloudways account, and click into your Server. You’ll see your Public IP address like this:
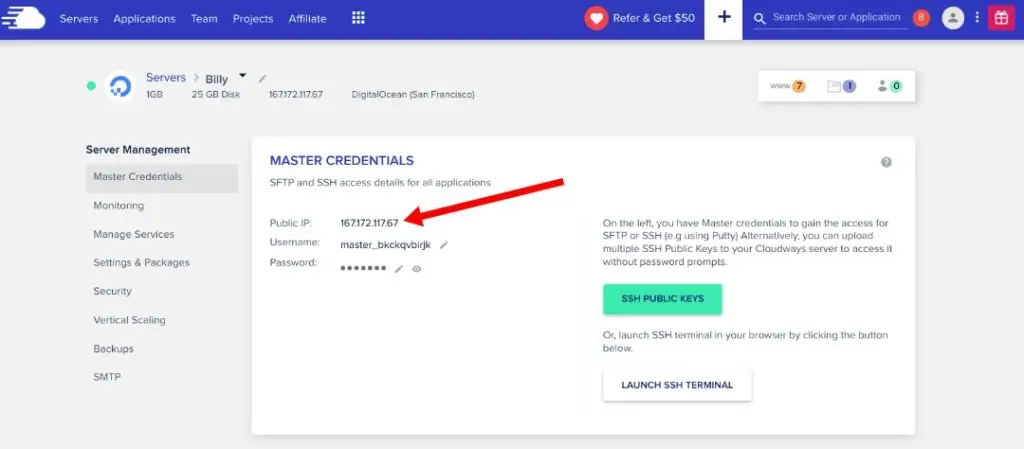
Click the Public IP address to copy it.
Now go back to the NameSilo tab. We need to create two new DNS records, and point them to your Cloudways server. See that little box that says “Add/Edit a Resource Record”? Click the first link, the one that’s literally just an “A”.
In the box that appears, there will be a field called “IPV4 Address”. Paste your Cloudways Public IP address into that field. Change the “TTL” field to 3600. Then hit Submit.
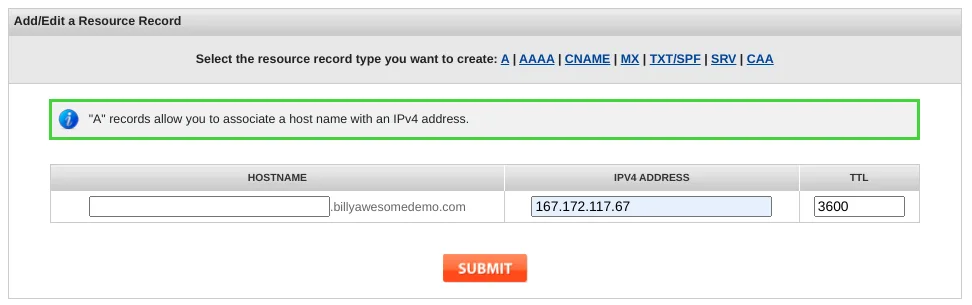
Now do it a second time. Click the “A” link again, then paste the Cloudways IP into the same exact field as before, and change “TTL” to 3600. But this time, put “www” into that first field called “Hostname”. Then hit Submit.
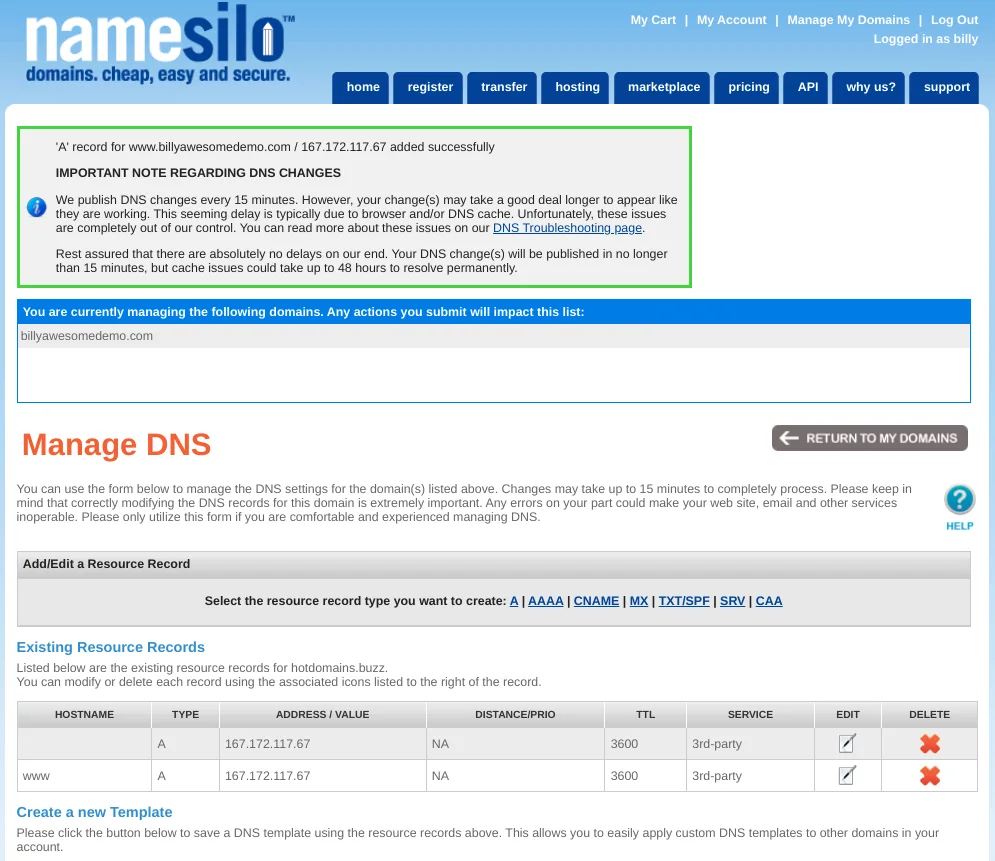
When you’ve added these two records, the page should look something like this (except with your domain name and your IP address of course):
And that’s it, my friend! You are done-zo! You can close the NameSilo tab anytime you like. Changes will take up to 15 minutes to be reflected.
You probably won’t need to come back into this Manage DNS interface very often, thankfully. The only times you’d really need to make more DNS changes would be if:
- You’re setting up a WordPress site on Cloudways
- You’re modifying your domain’s email settings
- You’re setting up Google/Facebook domain validation (there are easier ways to do this though)
Okay, mission accomplished. You registered and configured your domain name. Nice job! Now think about setting up your web hosting, if you haven’t already.